The Bunsen Burner
The Bunsen Burner
The following texts are the property of their respective authors and we thank them for giving us the opportunity to share for free to students, teachers and users of the Web their texts will used only for illustrative educational and scientific purposes only.
The information of medicine and health contained in the site are of a general nature and purpose which is purely informative and for this reason may not replace in any case, the council of a doctor or a qualified entity legally to the profession.
The Bunsen Burner
Effective Use of a Burner
During chemical or physical changes, energy is often transferred in the form of heat. This transfer can be measured by a change in temperature. In this activity, you will test the effective use of a Tirrill burner. You will vary the height of the position of a beaker of water above the burner and observe how long it takes to boil the water. All other factors will be kept constant. The intensity of the flame and amount of water heated will not change. Because the intensity of the flame doesn’t change, the amount of heat provided will not change. Also since the amount of water doesn’t change, the amount of energy (as heat) needed to boil the water will not change.
Objectives:
- Heat a beaker of water using a Bunsen Burner
- Measure distances using a ruler
- Measure temperature using a thermometer
Materials:
- 100 mL graduated cylinder
- 250 mL beakers (4)
- Bunsen Burner
- Striker or matches
- Thermometer
- Ring stand
- Ring
- Wire gauze
- Ruler
- Stop watch or clock with second hand
- Beaker tongs or hot mitts
- Hot pad
- Distilled water
Safety Precautions:
- Always wear safety glasses and lab apron
- Clean up spills immediately
- Do not eat or drink anything in lab
- Assume that all glassware is hot and handle with hot pads
- Boiling water can burn skin
- Never leave a Bunsen burner unattended
Pre-lab:
- Read the entire lab activity. Hypothesize about what the most effective position above the flame will be. Record your hypothesis.
- What are the constants in this lab? (What doesn’t change?)
- What are the variable in this experiments? (What changes?)
- What is a dependent variable?
- Which measurement in this experiment is the dependent variable?
Procedure:
- Label four beakers 1, 2, 3, and 4. Using a graduated cylinder measure 100 mL of distilled water into beaker 1. Measure and record the temperature of the water in data table 1. Repeat this process three more time for the remaining three beakers.
- Set up the ring stand and attach the ring between the two lab partners. Place wire gauze on the ring to provide a platform on which to place the beaker of water.
- Connect the burner to the gas inlet between the two partners of your group.
- Light the burner by first turning on the gas flow and using the striker to ignite the gas.
- When the flame is lit, adjust the gas flow and oxygen flow so that the flame is blue with an inner light-blue cone. A yellow flame is too cool and needs more oxygen.
- After you adjust the flame, move the burner to the ring stand and adjust the height of the wire gauze above the flame to approximately halfway up the inner blue cone. Estimate the distance from the top of the burner to the wire gauze with a ruler and record this distance in data table 2.
- Pull the burner to the side carefully and place beaker 1 on the wire gauze. Return the burner to the original position. Record the time that it takes for the water to boil in data table 2.
- Carefully pull the burner to the side and with beaker tongs, remove the hot beaker and place it on the hot pad.
- Return the burner to the original position and adjust the wire gauze to the top of the inner blue cone. Remove the burner to the side and place beaker 2 on the wire gauze. Estimate the height from the top of the burner to the wire gauze and record in data table 2.
- Record the time in seconds that it takes for the water to boil in data table 2.
- Repeat this procedure with beaker 3. Move the wire gauze further up the same distance above the burner as the distance between 1 and 2.
- Repeat with beaker 4 again moving the beaker the same distance further above the burner.
- When the beakers are cool, empty into the sink at your station.
Data Tables:
Data table 1
Beaker |
Starting temperature of water (°C) |
1 |
|
2 |
|
3 |
|
4 |
|
Data table 2
Test |
Height of the wire gauze above the burner (cm) |
Time to boil (s) |
1 |
|
|
2 |
|
|
3 |
|
|
4 |
|
|
Postlab Activity.
- Calculate the heating rate (°C/s) for each trial.
- Draw a graph of your heating rate per trial with class average heating rate per trial. Be sure to include title, axis labels and units, and clearly identify data.
Post-lab Questions: Use the graph and data tables to answer the following postlab questions.
- Why is the height of the wire gauze the independent variable?
- Why is the time to boil the dependent variable?
- What are the differences you observed in the four trials?
- What is the best position for the wire gauze? Why?
- Why do you use beaker tongs?
Conclusion:
Write a paragraph that summarizes this lab. Did you achieve your objective? Comment on any errors that occurred. How could you do better on the next lab based on this experience?
Source : http://faculty.cbhs.org/dsandberg/Effective%20use%20of%20a%20burner.doc
Web site link: http://faculty.cbhs.org/dsandberg
Google key word : The Bunsen Burner file type : doc
Author : not indicated on the source document of the above text
If you are the author of the text above and you not agree to share your knowledge for teaching, research, scholarship (for fair use as indicated in the United States copyrigh low) please send us an e-mail and we will remove your text quickly.
The Bunsen Burner
CHEM 11 The Bunsen Burner
Purpose: To learn to operate and control the Bunsen burner.
Materials: Bunsen burner (with gas hose)
sparker or barbecue lighter
nichrome wire
retort stand and ring clamp
wire mesh
250-mL beaker
stopwatch
thermometer
beaker tongs
crucible tongs
Safety Precautions:
Wear goggles and apron at all times.
Always light Bunsen burner with air holes closed.
Never leave lit Bunsen burner unattended.
Procedure:
PART 1: Learning about the Bunsen burner
- Gather the Bunsen burner (with gas hose), sparker and nichrome wire.

- Examine the burner and learn the names of its parts (see Figure 2.1).
- Remove the barrel by unscrewing it.
- Remove the needle valve by unscrewing it.
- Inspect all three sections to see if they are clean and not corroded. Notify the teacher of any problems.
- Look through the centre of the main burner and notice the small hole running through it. This is for gas.
- Re-assemble the burner by turning the needle valve and barrel into place until they stop.
- Unscrew the needle valve three complete turns.

- Connect the burner to the gas outlet with the hose. Push the hose on tight, but do not twist it.
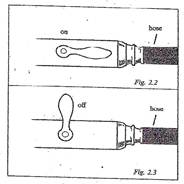
- Look at Figure 2.2 and notice how to turn the handle so that the gas will be on. The gas is on when the handle points in the same direction as the hose.
- Get the sparker ready by holding it above the burner, ready to spark. Then, have your partner turn on the gas while you light it.
- If the burner does not light with the first two sparks, turn off the gas, wait a few moments and try again.
- This produces a yellow (luminous) flame. Twist the barrel to open the air holes until the flame becomes blue (non-luminous)
- CAUTION – When lighting a Bunsen burner ALWAYS close the air holes before lighting.
- Notice that two cones have been formed. Draw a rough sketch here
- Test the flame to find the hottest part using the nichrome wire.
- Insert the nichrome wire into the flame and slowly move it around within the flame. It will glow brightest in the hottest parts of the flame.
- In the sketch above, indicate the hottest and coolest parts of the flame.
PART 2: Heating Water
- Gather the remaining materials. Set up the retort stand, ring clamp, and wire mesh as demonstrated by the teacher. Place the burner under the mesh.
- Pour about 100 mL of cold tap water into a 250-mL beaker.
- Measure and record the temperature of the water in the data table below.
- Remove the thermometer.
- Place the beaker on the wire gauze.
- Heat the water over a yellow flame for 2 minutes. Adjust the flame so that the beaker is in the hottest part of the flame.
- Shut off the burner.
- Measure and record the new temperature. DO NOT let the thermometer touch the sides or bottom of the beaker.
- Repeat step 12 using a blue flame, and record all data below. Use the same beaker of water.
|
Initial Temperature |
Final Temperature |
Change in Temperature |
Yellow Flame |
|
|
|
Blue Flame |
|
|
|
- Compare the results. Which flame is hotter? __________________
- Wait for all apparatus to cool before cleaning up.
- In cleanup area, wash beaker with proper cleaner. Dry beaker with paper towel.
- Return all apparatus and materials to their appropriate locations.
- Clean off the lab bench
Conclusions:
- Explain how to adjust the burner for different types of flames.
- Compare the flames for heating.
- What is the purpose of the needle valve?
- How would you adjust the Bunsen burner to obtain a luminous flame?
- How would you adjust the Bunsen burner to obtain a nonluminous flame?
****************************************************************************************************
Glass Manipulation
Problem: How can we cut, firepolish, seal, and bend glass?
Materials:
about 35 cm of glass tubing (the length of one floor tile)
glass cutter (two to share for the class)
Bunsen burner (with gas hose)
sparker or barbecue lighter
wing top (there are not enough for everyone in the class to use at the same time)
Safety Precautions:
Wear goggles and apron at all times.
Always light Bunsen burner with air holes closed.
Never leave lit Bunsen burner unattended.
To see if glass is hot, touch very lightly and quickly.
Procedure:
Cutting Glass
1. At the front counter, select a piece of glass and a glass cutter.
2. Using a glass cutter, scratch around a piece of glass about 35 cm long (the length of one floor tile). Apply medium pressure on the glass cutter and rotate the piece of glass to scratch all the way around.

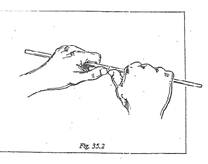
3. Hold the glass tube in both hands, with the scratch facing away from you and your thumbs behind the scratch (see Figure 35.2). Exert firm but gentle pressure on the tube with your thumbs until the tube snaps apart.
4. Look at the freshly cut edge. Carefully feel it.
Firepolishing
5. Gather the Bunsen burner (with gas hose), and sparker or barbecue lighter.
6. Light your Bunsen burner. Adjust it for a nonluminous flame with a double cone.
7. Insert the cut end of your tube into the flame, just above the inner cone (see Figure 35.3). Hold it as vertically as possible. Rotate the tube in the flame until a bright yellow color appears. Hold the tube in the yellow flame for about 1/2 minute.
Sealing Glass
8. Use the same piece of glass for firepolishing and sealing glass. You do not need to let the glass cool before using it for sealing, but it will be hot, so hold the glass in the middle of the tube.
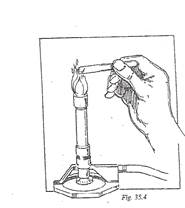
 9. Seal the end of the tube which was not firepolished. Hold the end of the glass tube in the flame above the inner cone. Hold the tube horizontally and rotate the tube in the flame (se Figure 35.4). Continue this procedure until the tube is sealed.
10. Remove the sealed tube from the flame and allow it to cool on your table top for ten minutes on a clean and dry table top.
Bending Glass

11. Install the wing top, if available, onto your Bunsen burner. You may use the Bunsen burner without a wing top if none are available.
12. Light the Bunsen burner and adjust it for a nonluminous flame with a double cone.
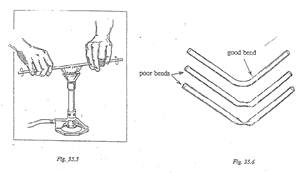
13. Hold the glass tube at its ends with both hands. Hold it horizontally so that the flame can spread the heat evenly over the area of the glass that you want to bend. Rotate the tube continuously in the flame (see Figure 35.5).
14. After the flame turns yellow, and the glass becomes plastic, place it on a clean and dry table top. On the table, bend the glass into a gentle and graceful curve at a right angle (see Figure 35.6). Do not bend the glass in the flame.
15. Allow the glass to cool for ten minutes on the table top.
Conclusions
1. How did the freshly cut glass edge look and feel?
2. How did firepolishing change the freshly cut glass edge?
3. Why do we need a nonluminous flame with a double cone?
4. Why do we always place the glass just above the inner cone?
5. Why did the end of the glass that you were holding remain cool?
6. Why were you instructed to rotate the glass in the flame?
7. Why does the glass seal faster when it is held horizontally?
8. What is the purpose of the wing top?
9. What is the advantage of bending the glass on the table top?
Source : http://hrsbstaff.ednet.ns.ca/lmacken/chem11%20pages/The%20Bunsen%20Burner%20-%20student%20copy.doc
Web site link: http://hrsbstaff.ednet.ns.ca/lmacken/
Google key word : The Bunsen Burner file type : doc
Author : not indicated on the source document of the above text
If you are the author of the text above and you not agree to share your knowledge for teaching, research, scholarship (for fair use as indicated in the United States copyrigh low) please send us an e-mail and we will remove your text quickly.
The Bunsen Burner
WHAT IS A BUNSEN BURNER????
Introduction: The purpose of the Bunsen burner
The Bunsen burner is used in a variety of science exercises. The Bunsen burner has a variety of uses and its intensity varies according to how you set it up. It can boil water and even melt metals. This lab is designed for you to become familiar and comfortable with the use of a Bunsen burner.
On your lab bench you probably see a weird looking metal thing that is attached to a rubber tube. The weird looking metal thing is actually the Bunsen burner.
The valve that is on the table is where the gas is coming from. The gas is what the Bunsen burner uses as a fuel.
If you turn the valve to 90 degrees, you will notice that no gas comes out. This is because the main gas valve is not turned on. The main gas valve is controlled by the teacher and will only turn on when all of the Bunsen burners have been assembled properly.
Source : http://www.umanitoba.ca/outreach/crystal/Support%20Files/Experimental%20Skill%20Development/Using%20Bunsen%20Burners%20-%20Experimental%20Skill%20and%20Investigation.doc
Web site link: http://www.umanitoba.ca/outreach/crystal/
Google key word : The Bunsen Burner file type : doc
Author : not indicated on the source document of the above text
If you are the author of the text above and you not agree to share your knowledge for teaching, research, scholarship (for fair use as indicated in the United States copyrigh low) please send us an e-mail and we will remove your text quickly.
The Bunsen Burner
If you want to quickly find the pages about a particular topic as The Bunsen Burner use the following search engine:
The Bunsen Burner
Please visit our home page
Larapedia.com Terms of service and privacy page
